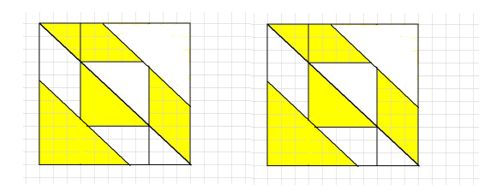
For our modern look this month, the colour scheme of the foreground is simple clear Easter egg colours like cyan, magenta and yellow. The impression should be of a large amount of a single colour. Use batik, tone-on-tone, ombre or solids. Modern tiny prints or tiny polka dots would also work as long as there is a large proportion of a single solid background colour.
· Robin’s egg blue
· Baby-chick yellow
· Cherry blossom pink
· New leaf green – an exact balance between cyan and yellow
· Violet-purple like the crocuses to round out the Easter egg theme
It is a mistake to use a very pale pastel, because it will not contrast with the white background. Be bold in your colour choice and go for high-contrast.
The background is white solid or white-on-white print like undyed eggs.
These simple blocks are not as tricky as they look. While I was making the samples, I realized there is an easy way to make two blocks at a time with almost no waste. Each block works up to about 10 inches square which includes a generous edge allowance for later trimming.
This fun block is so rewarding: no fancy tools, no triangles, no tricky cutting or measuring. And, with this technique, two blocks are made at one time.

Cutting to make two blocks:
| Pieces to Cut | White | Colour |
| 5 inch square | Cut 1 | Cut 1 |
| 6.5 inch squares | Cut 2 | Cut 2 |
| 3.25 inch wide strip(s) | 32 inches | 32 inches |
Step 1: Sew opposite colour strips around the outside of each 5 inch square.  The white square will be inside a coloured box, and the coloured square will be inside a white box. Use the Courthouse Steps method, sewing short strips (5â€) on two sides, then longer strips (10.5 inches) along the other two sides.
Step 2: Press seams towards the coloured side.
On the wrong side of the lighter block draw a diagonal line corner to corner (shown as solid red line).  This will be your CUTTING line, not your sewing line. Usually the block with the most white will be easiest to see.  Don’t cut yet.
Stack the two blocks right sides together. The inner square seam corners should nest. It is more  important to match the two inner corners you will be sewing through.  Matching the raw edges is not as crucial since the blocks will be trimmed later.
Step 3: Sew ¼†on both sides of the line you drew. Sewing is shown with dotted lines.
Step 4: Cut the two new blocks apart along the centre line (solid red line) corner-to-corner. Press.

Step 5: Using the remaining four 6.5 inch squares, draw a diagonal line corner-to-corner on the wrong side of each of the four squares.  This will be your first sewing line.

Then draw a second line exactly 1/2 inch from the first one.  This is optional.  If you sew on this second line, you will get four bonus  half-square triangle blocks instead of eight waste off-cut triangles. The resulting HSTs do not form part of the Hunter’s Star block –  you can add them to your stash or use them for a border. Do not cut yet.
Step 6: The final squares are positioned with the stitch-and-flip method. Position one white square and one colour square in opposite corners of each block, right sides together, matching raw edges at the outside corners. The colour square will overlap the colour in the centre of the block.

The second sewing line will be towards outer edge of the block. Sew on each of the two lines you drew.Â
Step 7: Now cut between the two sewing lines, freeing the bonus HST block, and then flip the corners out to complete the Hunter’s Star block. Press.

Press the finished block open. If you are making blocks for the block lotto, then don’t trim. If you are keeping them, then trim and square-up to 9.5 inches, using the central square as a guide so the outer border is an equal width on all sides.Â
Done!  You now have two Hunters Star Blocks (you need four for a full star).

And four bonus HSTs for future use.

Inspiration: https://blog.fatquartershop.com/classic-vintage-hunter-star/
By Nora Melzer


